
Windows 10 1909 – Use LXP in Task Sequence
A few weeks ago, my team and I started looking into the installation of LXP’s in a Windows 10 1909 OSD TaskSequence. This Post describes my current implementation to solve the need.
LXP’s (Language Experience Packs) are the new LIP’s (Language Interface Packs) in an appx package format delivered from the Microsoft Store (LXP’s also receive updates from the store – cool or?).
As a base for my implementation I used this great guide from Christian Wunderlich. You can find the original Post here: https://techcommunity.microsoft.com/t5/core-infrastructure-and-security/windows-10-multilanguage-deployment-with-memcm/ba-p/1347144
So, after clarifying the base requirements, let’s start with the “tutorial”.
Package
First, I want to show you my used Package regarding the LXP installation (If you need help how to create a Package, maybe this Blog post can help you: http://www.kombitz.com/2017/01/19/how-to-create-a-package-in-sccm-2012/#:~:text=How%20to%20Create%20a%20Package%20in%20SCCM%202012,click%20on%20Next%20to%20continue%20Weitere%20Artikel…%20 . Short note – we don’t need a program).
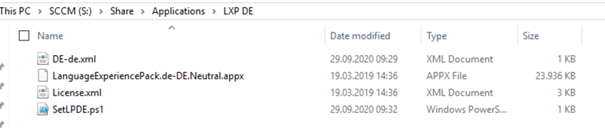
Before we can start with the fun stuff, we need to download the Local Experience Pack. It’s not available for 1909, but the 1903 Version is compatible with the 1909 installation.

After downloading the ISO, we can select the language we want from the ISO. Just copy the files (in my example all files from the Folder “de-de”) to your Package Share destination.

To be able to set the default language, we need to add an additional XML-Configuration (“DE-DE.xml” in my screenshot, you might know this kind of xml from the deprecated classic language pack installation). In my case I can use the XML provided in the original blog post.
<gs:GlobalizationServices xmlns:gs="urn:longhornGlobalizationUnattend">
<!--User List-->
<gs:UserList>
    <gs:User UserID="Current" CopySettingsToDefaultUserAcct="true" CopySettingsToSystemAcct="true"/>
</gs:UserList>
<!-- user locale -->
<gs:UserLocale>
    <gs:Locale Name="de-DE" SetAsCurrent="true"/>
</gs:UserLocale>
<!-- system locale -->
<gs:SystemLocale Name="de-DE"/>
<!-- GeoID -->
<gs:LocationPreferences>
    <gs:GeoID Value="94"/>
</gs:LocationPreferences>
<gs:MUILanguagePreferences>
<gs:MUILanguage Value="de-DE"/>
<gs:MUIFallback Value="en-US"/>
</gs:MUILanguagePreferences>
<!-- input preferences -->
<gs:InputPreferences>
    <!--de-DE-->
    <gs:InputLanguageID Action="add" ID="0407:00000407" Default="true"/>
    <!--en-US-->
    <gs:InputLanguageID Action="remove" ID="0409:00000409"/>
</gs:InputPreferences>
</gs:GlobalizationServices>
Now it’s time for some Powershell stuff. We need a little script (again, this is from the blog post I mentioned) to be able to work with the Custom XML created in the step before. This script uses the Custom xml and the intl.cpl command to change the Default language for the current and all new User (SetLPDE.ps1 in my screenshot).
start-sleep -seconds 20
$LogFileLocation = $env:TEMP+"\importlanguage.log"
Start-Transcript -path $LogFileLocation -Force
function prepare-scriptname
{
if ($hostinvocation -ne $null){$hostinvocation.MyCommand.Path}
else{$script:MyInvocation.MyCommand.Path}
}
[string]$ScriptName = prepare-scriptname
[string]$ScriptDirectory = Split-Path $ScriptName
Write-Output "Create Path"
$dedeXML = $ScriptDirectory + "\De-de.xml"
Write-Output "import language settings from XML"
& $env:SystemRoot\System32\control.exe "intl.cpl,,/f:`"$dedeXML`""
Stop-Transcript
Ok, we have prepared all necessary files for “de-de”. If you want to support more languages, you need to prepare all the different Languages on its own. Just repeat the steps before for each of the LXP’s.
Task Sequence
Let’s have a look inside of the Task Sequence. If you want to support multiple languages based on variables you can copy the “Install DEDE” Step and the “DE-DE” Group (please verify the powershell and cmd commands for the right file names). Make sure you add some variables to the Step and the Group, so you can control which step should run. Please check that you linked the right Package containing all the described files above for the right language.
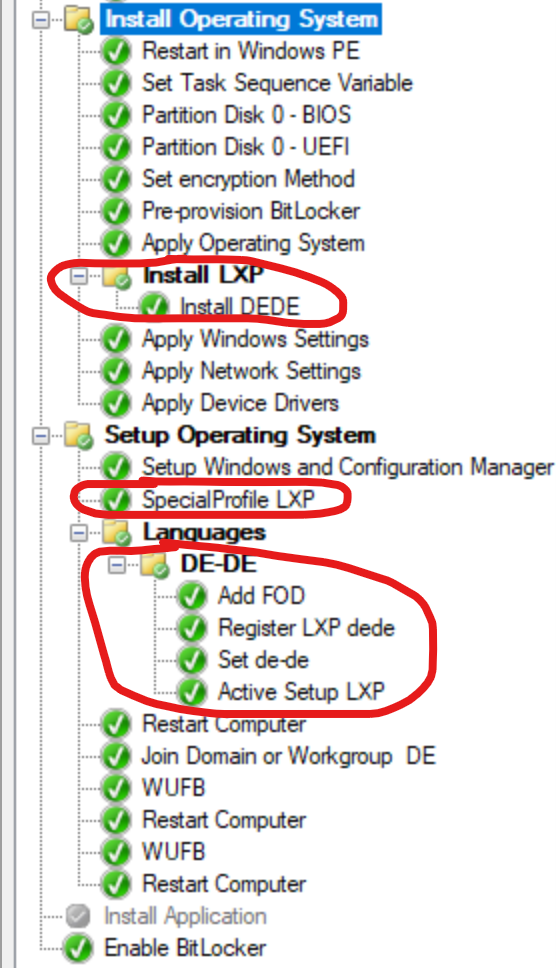
Install DEDE:
Use the Add-AppxProvisionedPackage command to Install the LXP. Link the Package with the described files above.
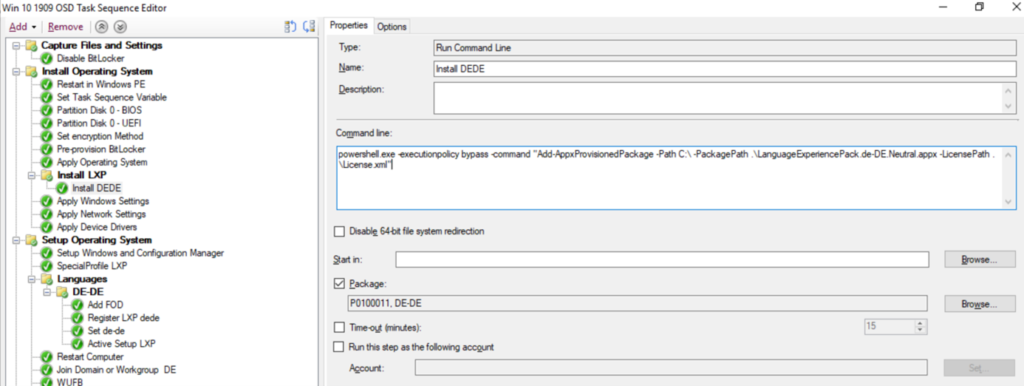
powershell.exe -executionpolicy bypass -command "Add-AppxProvisionedPackage -Path C:\ -PackagePath .\LanguageExperiencePack.de-DE.Neutral.appx -LicensePath .\License.xml"
SpecialProfile LXP:
Before you can continue, you need to create the AllowDeploymentInSpecialProfiles key to be allowed to register the installed LXP using a Special Profile. I placed this Step outside of the Task Sequence Group DE-DE because if you work with multiple Language Groups you only must create this Step once.
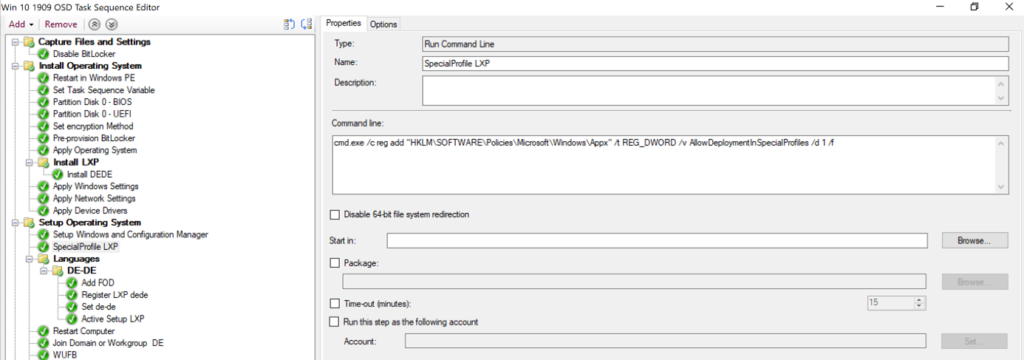
cmd.exe /c reg add "HKLM\SOFTWARE\Policies\Microsoft\Windows\Appx" /t REG_DWORD /v AllowDeploymentInSpecialProfiles /d 1 /f
Add FOD:
The next step will install some German Features on Demand. Just a short reminder… Have a look at you execution policy for PowerShell Scripts ;).
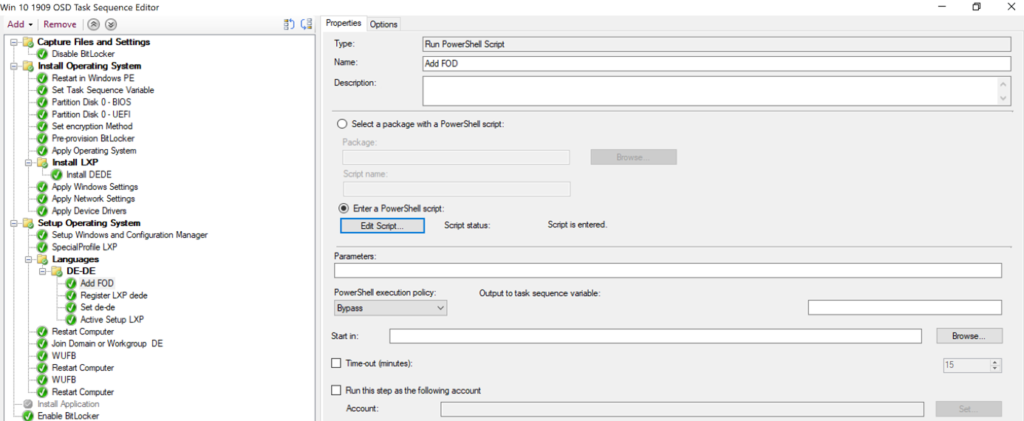
I entered a PowerShell Script for that without an additional Package. These commands will download the Features on Demand directly from the internet. You can also create a package with content for that.
& DISM.exe /Online /Add-Capability /CapabilityName:Language.Basic~~~de-DE~0.0.1.0
& DISM.exe /Online /Add-Capability /CapabilityName:Language.Handwriting~~~de-DE~0.0.1.0
& DISM.exe /Online /Add-Capability /CapabilityName:Language.OCR~~~de-DE~0.0.1.0
& DISM.exe /Online /Add-Capability /CapabilityName:Language.Speech~~~de-DE~0.0.1.0
& DISM.exe /Online /Add-Capability /CapabilityName:Language.TextToSpeech~~~de-DE~0.0.1.0
Register LXP dede:
As mentioned before the “AllowDeploymentInSpecialProfiles” Regkey is needed for this step to register the installed LXP. This command is not allowed to be executed as SYSTEM, so we need to create a local admin account to be able to go on. Because I am a bit lazy (I think we are all a bit lazy – that’s why we automate things right?), I just used the built in Administrator (again, yes I know I should disable the builtin Administrator and use some kind of temporary service account – it’s just a Testlab).
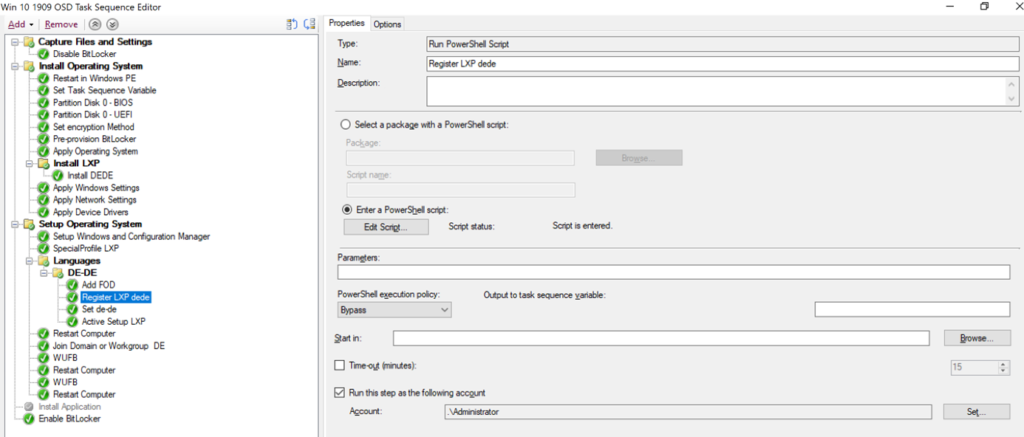
$pathxml = (Get-AppxPackage -AllUsers | ? Name -Like *LanguageExperiencePackde-DE*).InstallLocation
Add-AppxPackage -Register -Path "$pathxml\AppxManifest.xml" -DisableDevelopmentMode
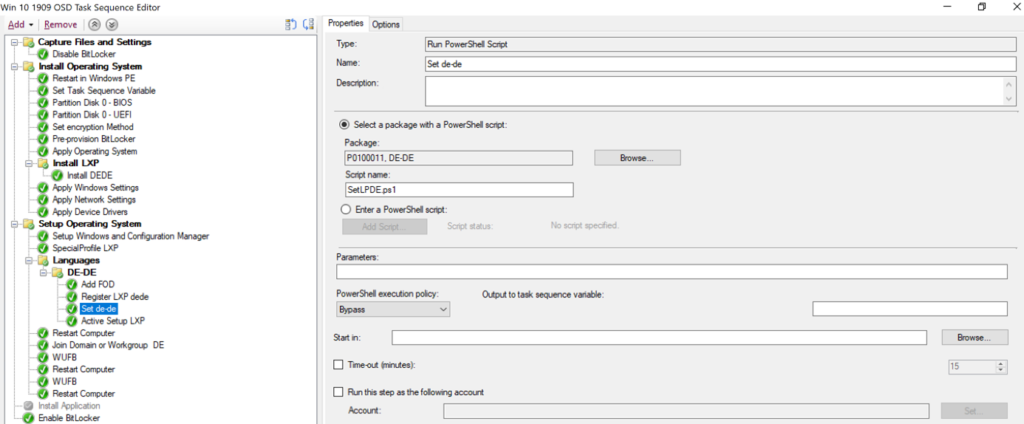
Set de-de:
Did you use a temporary local Service Account with local admin rights in the step before? Be sure to delete it again! 🙂 Finally, we can change the Language to the newly installed one. Link the Package again and call the SetLPDE.ps1 Script.
Active Setup LXP:
Because you have to wait a looooong time till the Settings App UI language is changing to the newly added one, I created an Active Setup which starts the ReconcileLanguageResources (this task installs language components, matching to the Users language list) scheduled task.
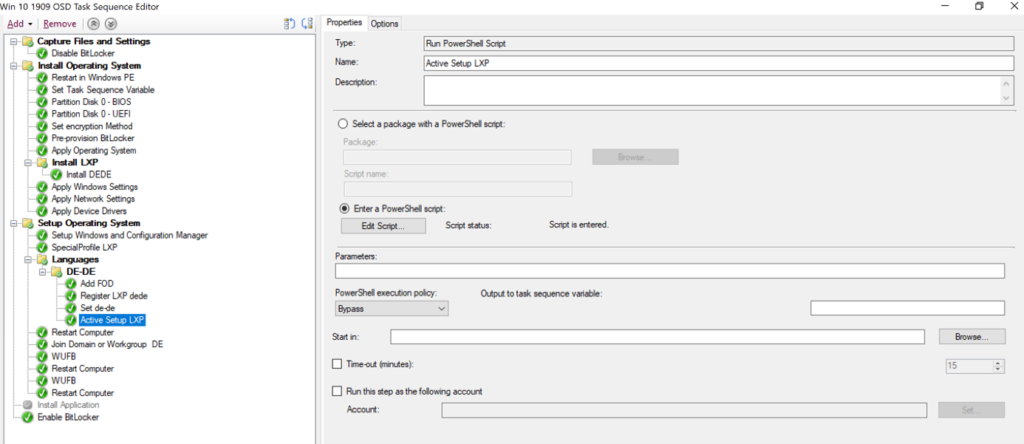
$path = "HKLM:\Software\Microsoft\Active Setup\Installed Components\LXP"
New-Item -Path $path -Value LXP –Force
New-ItemProperty -Path $path -Name StubPath -Value 'powershell.exe -executionpolicy bypass -command "Start-ScheduledTask -TaskName \Microsoft\Windows\LanguageComponentsInstaller\ReconcileLanguageResources"' -PropertyType String -Force
New-ItemProperty -Path $path -Name Version -Value "1,0" -PropertyType String -Force
And that’s it. I just want to add a few additional notes here which might help you…
- If your Search bar doesn’t work anymore… make sure you install the latest cumulative update
- For the “Install DEDE” Step you need the Windows PowerShell (WinPE-DismCmdlets) Optional Components in your WinPE Image
- Restart you PC if your search bar is still in English… I didn’t find a solution for this so maybe you can help me out 😉
- Built-in Apps will change the language after the Windows Store updates your apps. Be patient or start an update scan from the store. I still need to implement a way to start the “UpdateScanMethod” for triggering the Store Updates automatically. Maybe you have a good idea for that?
In my opinion, this is a good way to map the well-known process of LIP’s with LXP’s. However, I wonder if this is the best way to provide languages for the user. There are still manual actions like starting a scheduled task, rebooting to change the language in the start menu and the search bar and manually searching for app updates in the store to adjust the language for built-in apps (yes, you can wait until the store automatically checks for updates – but this can take time). If you see any improvements in the process, please let me know.
Aron
[…] year I wrote a Blog Post about Language Experience Packs (LXP’s) within a 1909 OSD Task […]